Produce digital adaptations in batch
This page explains how to produce many adaptations at once from a single digital template. Batch production lets you generate a large set of adaptations in one go, instead of creating each one separately. You provide the content for every adaptation as a row in a table, then produce them all together.
To produce a single adaptation instead, use Create an adaptation.
| These steps cover digital templates. |
Prerequisites
Before you begin, ensure you have:
-
A published template with the parameters you need to fill in.
-
A role that lets you create adaptations, such as Creator for Assets, which the Standard User preset includes. Each role’s permissions are listed in User role presets and permissions.
-
Optionally, a spreadsheet application such as Microsoft Excel or Google Sheets, if you want to import the batch data from a file rather than enter it on screen.
Produce a batch of adaptations
You produce batches in Content Portal: open a template’s batch window, add a row for each adaptation, and produce them all at once.
-
Open Content Portal from the application switcher at the top left.
-
From the left navigation, select Adaptations, then View Template.
-
Select the All digital templates tab.
-
Select the template you want to use.
-
Select Create Adaptation, then Create Batch.
The Create Batch Adaptations window opens. It shows a table where each row is one adaptation and each column is a parameter from the template. Required parameters are marked with an asterisk.
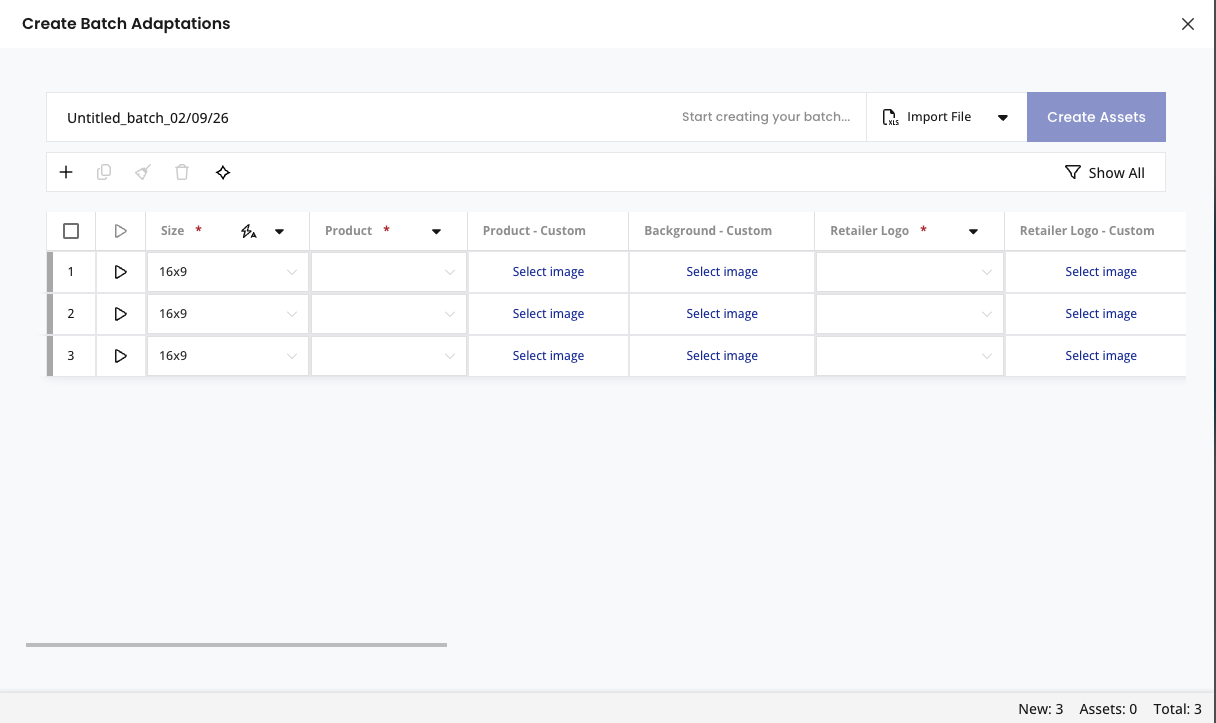 Figure 1. Create Batch Adaptations
 -
Optionally, replace the default batch name (such as
Untitled_batch_02/09/26) with one that identifies this batch. -
Add the content for each adaptation, using either method:
-
Enter it on screen: use the add-row button (
+) to create a row for each adaptation, then set each parameter in the row. Select Select image for an image parameter, choose a value from the Size list, and type text values directly. -
Import it from a file: select Import File and choose a spreadsheet, as described in Import batch data from a spreadsheet.
-
-
Select Create Assets. Each row is produced as a separate adaptation.
-
Find your finished adaptations in My Content (select from the top right), under Digital Adaptations, in the Batches tab.
Batch adaptations follow the same review route as single adaptations before you can download them. To find and download them, follow Find and download your adaptation.
Import batch data from a spreadsheet
When you produce a batch, you can prepare the data in a spreadsheet and import it into the Create Batch Adaptations window, instead of entering each row on screen. Start from the example file, which already has the correct columns.
Download the example file
The example file gives you a spreadsheet with a column for each of the template’s parameters, ready to fill in.
-
In the Create Batch Adaptations window, select the dropdown arrow next to Import File, then CSV Example.
-
Choose whether to separate values by commas or semicolons.
-
Select Download CSV.
Fill in and import the file
Fill in the downloaded file with one row per adaptation, and make sure that:
-
Column names match the template’s parameter names exactly, with no extra spaces.
-
Every row is complete, with no missing values.
-
Any links point to valid, reachable files.
-
Dates use a consistent format across all rows.
When the file is ready, select Import File in the Create Batch Adaptations window and choose it.
Excel can change your data in ways that break the import, and the two most common culprits are the field separator and the character encoding.
Keep the field separator consistent
A CSV separates columns with a delimiter, either a semicolon (;) or a comma (,).
Use the same delimiter throughout the file as the one you chose when downloading the example, so the columns line up when you import it.
To change the delimiter Excel uses:
-
On Mac: open Excel > Preferences > Edit and clear Use system separators.
-
On Windows: open File > Options > Advanced and change Use system separators.
Preserve special characters
If your content uses non-English characters, always save the file as CSV UTF-8. Saving in another format can corrupt those characters, and any batch built from the file will carry the same errors.
If special characters already look wrong when you open a spreadsheet in Excel, re-import it:
-
Open a blank workbook and select Data > Get Data (Power Query) > From Text/CSV.
-
Choose your file, then set File Origin to 65000: Unicode (UTF-8).
-
Match the delimiter to the one used in the file, then load the data.
-
Save the file again as CSV UTF-8 before importing it.
Troubleshooting
Problem: The batch does not produce any adaptations.
Solution: check that every required parameter, marked with an asterisk, has a value in each row. If you imported the data, also check for broken or unreachable links, column names that do not match the template’s parameters, incomplete rows, and inconsistent date formats.
Problem: Imported values are not recognised, and the batch does not proceed.
Solution: the values in your file may not match the values the template expects. Aliases may need to be set up on the template to map your values to the expected ones.